Tuesday 23 November 2010

TB Line Romans

TB Line, an Italian manufacturer of 10mm figures have finally moved into Ancients having already released a very impressive range of Medieval models. If anything their new Republican Romans are their best models yet. They have totally blown me away. Here are some highlights of the range. Remember these are 10mm!!!
Triarii


Cavalry
Commander
Velite

This company really are starting to build a reputation as the best manufacturers of 10mm figures on the market. I'd be really interested if anyone has bought some themselves; are they as good as the website masters?

Thursday 7 October 2010

Finally a game?

Possibly this weekend will be a chance to introduce a friend of mine to Warmaster Ancients with a ~1,000pt game of Imperial Rome vs Carthage. I'm off for a geek weekend to visit the Mantic Games open day and then fit in a couple of games of something.

If I do then I'll be trialling the Battle Chronicler program that Kasper from the Warmaster DK blog introduced me to through his great battle reports, but I think I'll have to transcribe it from hastily scrawled paper notes/maps I make as I go along.

If we don't get time for WA then I might just do a battle chronicler report for whatever we do play!

Monday 6 September 2010

Hannibal's Veterans

I spent yesterday painting up some more warmaster figures and I'm now very nearly done with the Carthage infantry and elephants and don't have too far to go with the heavy cavalry.

In the meantime, one unit I have finished up is Hannibal's Veterans. These are Magister Militum figures and come in just two poses, with an additional two command figures.

There doesn't seem to be much historical info on these guys, apart from they existed and were armed with a mix of captured Roman kit. Although how much seems to be a source of debate, as did who was in the unit (Cartheginians or allies) and how long they were an organised fighting unit.


All that means that I decided to paint them up exactly how I felt like it, without even having to worry about them being in any way accurate (not something that really bothers me anyway).


These figures were not a whole lot of fun to paint unfortunately. Only having the two poses made it a bit monotonous to paint, they also have a lot of detail on them, but it is not fantastically defined, which was annoying. There were slight mould lines and these run down the face, which is partially hidden behind the top of the shield, making them virtually impossible to remove and ruining quite a few of the faces. The mould lines then run down the front of the shield to one side of the boss (not down the rim or boss), again making them VERY hard to smooth out with all the detail on the shield.

The final problem was that things like the raised rim around the shield are not very well defined, but are present enough that they can't be ignored! This translated into hours of painstaking, essentially free-hand work to paint them, for a pretty mediocre result.

Overall I'm not sure I'd be that keen to add another unit to my force.

Thanks for looking!

Sunday 5 September 2010

Silflor Grass Tufts

I've been looking for a way to liven up the arid/desert bases for my Carthage force for a while now, and I've toyed with the idea of using dead static grass that is a pale yellow colour, to make the bases look a little less like a sand desert.

However in the end I've decided to give Silflor grass tufts a go. These are strips of random clumps of static grass, designed to look like natural tufts of grass. I decided to try a couple of small packs which retail for about £3.70 a box. I wasn't sure exactly how much you get for that, so I've photographed the contents with a couple of 10mm figures.

These are 2mm or "short" tufts and are a good fit for 10mm scale. The strips are double sided, so you do get a fair number of tufts. As you can see on the cutting mat, it comes to about 15cm x 10cm.

The tufts themselves are irregularly shaped and the grass seems to be bonded to a flexible glue that stays lightly tacky. They can be pulled apart to make smaller tufts as well without noticeably damaging the appearance of the grass. I've used tacky glue to attach mine to the bases.


As you can see the grass is maybe too much of a good match for my arid base scheme! It does make the bases look more interesting in real life though and certainly achieves the look I was going for of a parched land rather than total desert.

Would I recommend these? Probably only for very specific jobs/projects. They give a better finish and more control over placement than static grass and glue, but they are more pricey. I can definitely see the benefits of the larger tufts for dioramas and larger show-piece models, but for my 10mm projects they are not going to replace static grass for basing grass-land figures.

Saturday 4 September 2010

Numidian Light Horse

I've now finished up the 3 units of Numidian cavalry, which now makes 4 units of them in total. These figures are again made by Magister Militum and are really nice. There are 4 separate poses in a pack of 12 and there is also a trumpeter and a leader figure in the Carthage command pack as well. This means they are fun to paint, even in large numbers as there isn't too much repetition. The detail is nice and crisp and the common complaint about MM, that their horses are a little undersized, is not a problem as Numidians rode small ponies.


I've only photographed a couple of the units, but I'll show them all together in an army shot in a few weeks as I'm only a few units away from finishing the initial force now. You can see that a couple of stands are a figure short as the two packs I got didn't stretch to 3 full units, but I thought I'd just paint them up anyway and I can add an extra figure later if I need to.


I again went with the stylised Carthage figure for one unit's shields, as with the earlier javlinmen, but I think this time I've got it a bit more crisp and consistent. The non-photographed unit has the rawhide shield designs I also used on the javlinmen.

I also went a bit more ambitious with the 3rd unit and painted on a hand-print, which was also one of the Numidian designs I came across in my research on shields. This was not that consistent across the unit, but it come out pretty well and I'm pleased with it.

I've also just got some Silflor grass tufts to liven up the desert type bases of my Carthage force, so I'll post some pictures of them with them also on some WM bases and a sort of review soon. Also coming up will be Hannibal's Veterans and hopefully some elephants finally!

Thanks for looking!

Thursday 26 August 2010

Numidian Javlinmen

After promising for a few updates I've finally got some pictures of my finished Numidian Skirmishers. These are Numidian Javlinmen by Magister Militum. They come in a pack of 30 figures with 2 different poses and I've spread them over 6 bases of 5 models each to give me two units for my money.

These models really were a pleasure to paint, probably the best 10mm models I've come across so far. I'm fairly pleased with the paint job as well, so I've posted the pictures a little bigger than normal (you can click on them to make them even bigger and even zoom in from there should you wish).

They have nice crisp details and only on the legs do you have to force the detail with the paint job, the rest of the model can be just highlighting raised areas.


The bases aren't totally finished, they need edging with yellow, and I'd like to add some dead coloured static grass or little silflor tufts of dead grass just to liven up the bases. I hand painted a different shield design for each unit, one has them painted like rawhide, the other has leather shields with the Carthage stylised figure in white, which seems to appear on a few Carthage shields. I rushed the stylised figures a bit and the finish is a bit shabby, but I'm hopeful of doing better on my upcoming Numidian Horsemen.

The actual leather shields themselves were painted with a basecoat of GW Scorched Brown and then stippled with a stiff brush with a couple of layers of GW Dark Flesh and then a final stippled layer of Vermin Brown. This give the effect of depth and texture on the flat surface.

A group shot of them ready to harass the enemy flanks!!


Hopefully next time it'll be their partners in crime the Numidian Light Cavalry. I'm putting the finishing touches to 3 units at the moment.

Thanks for looking!

Monday 23 August 2010

Painting Sticks

Ever since I started the blog I've been inundated with literally no requests at all about how I batch paint warmaster figures quickly. So in order to satisfy these fictitious people I thought I'd post an explanation.

It's best illustrated with a picture;


Once I've cleaned up the models and filed the bases flat, I group them together into poses, sometimes grouping very similar poses together, you can see in the picture above (click on it to make it larger) that the champion and standard bearer of these Carthaginian "Hannibal's Veterans" at the right end of the row are just variations on one of the standard infantry poses.

The sticks themselves are 3mm MDF cut into thin strips that I made myself, but I have seen lolly-sticks used as well.

I use a small amount of blu-tack to attach them to the stick and then spray them black, before painting them. The main advantage to this method is speed. You paint the same detail on the models at the same time, but I've found an even quicker method is to move the models as little as possible. For example if you are painting the hem of a robe it would take typically 3 or 4 brush strokes to go all round the model. Instead of painting the robe on each model in turn (which on the above stick would involve moving it 54 times!) - paint the same brush-stroke on each model in turn, then move the stick to another angle (moving it just 3 times instead).

I'll admit that this method can get boring, but ultimately if you have to paint 15-30 of the same figure in the same way it is going to be a bit boring anyway, so you may as well do it in the most efficient way!

I normally only use this method for homogeneous infantry blocks. Skirmishers I tend to base 5 to a stand, so there is enough room to paint them, same with light cavalry. If I am creating small dioramas for my command stands (as I'm doing with my Carthage, Viking and Persian figures) I also paint them on sticks so I can have more room and do a good job on them.

I've seen several similar examples on the internet of batch painting, if you have any thoughts please leave a comment.

Thanks for looking!

Sunday 22 August 2010

Warmaster Hedges

Ok, the promised hedges tutorial.

With defended terrain offering possibility in Warmaster of even the humblest infantry holding off a cavalry charge (it reduces "to hit" rolls from 4+ to 5+), it's important to have a variety of defensible terrain in your collection.

N-Gauge railway models are a great source of terrain, and I have bought some dry stone walling designed for model train layouts for my collection. However although nice, it does tend to come at a price, and almost always need further painting etc as well (as model train companies don't seem to go in for using painting to enhance scale, things tending to be monotone). For those people looking to save money and not spend ages making terrain, short cuts and nifty tricks using cheap items are great.

I've made a set of hedges using a household scouring pad and a bag of flock.

The scouring pad is about 8mm thick and I cut it lengthways into strips about 10mm wide, giving me a series of strips about 8x10x250mm.


I then spread some scatter grip glue from Antenociti's Workshop onto a piece of paper and dipped the scouring pad on three sides, before dipping/rolling it in flock. Scatter grip is good for this as it is VERY tacky and remains tacky after it is dry, ensuring the flock adheres to the irregular surface of the pad. You also need to dab some glue and flock onto the ends of the strip as well (but the bottom edge can be left without).

The flock I used was from AW as well, but I'm not sure they still make it. It is a mixed colour flock, predominately light green, but with some dark green and yellow mixed in. As I mentioned when describing my tree in an earlier post, when replicating nature getting layers and textures into the model is vital, and so multi shaded flock is a great cheat.

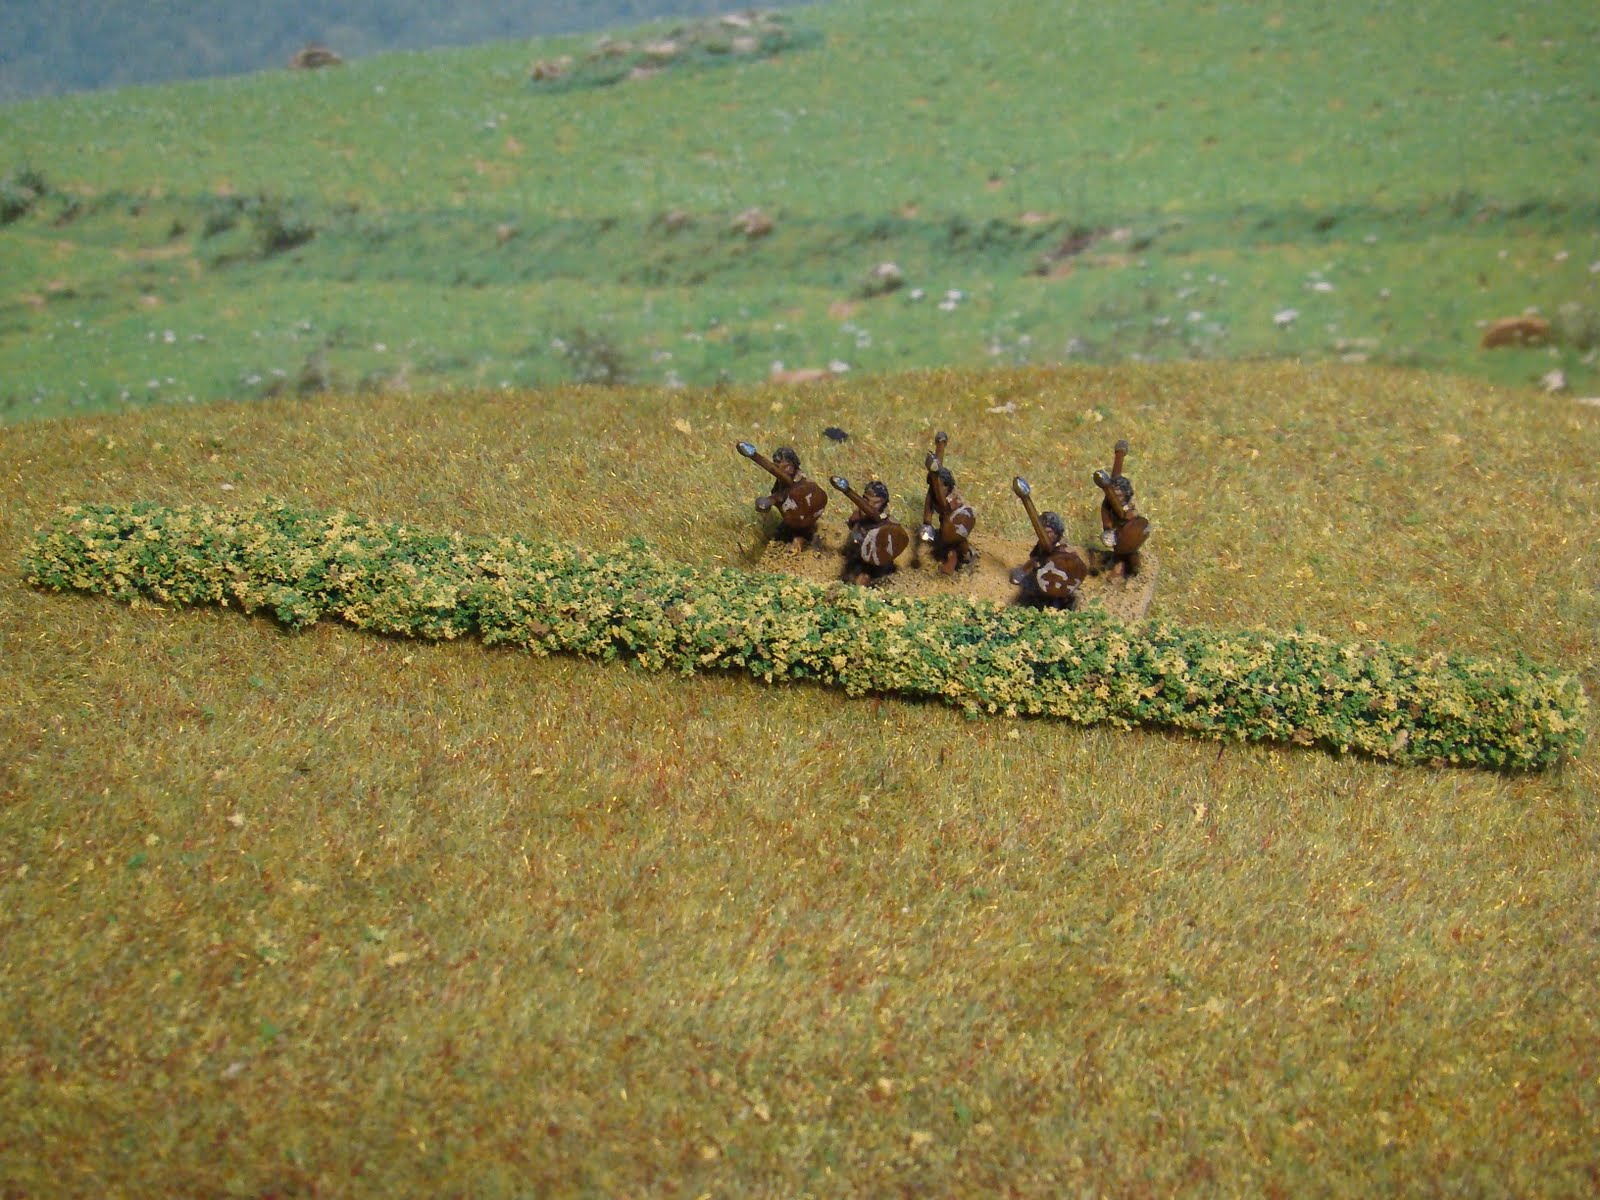
The finished hedge with some mercurial Numidian skirmishers lurking behind it!

Once dry it just needs a coat of matt varnish spray to "kill" the tackiness of the scatter grip, otherwise it is still so tacky that dust, cat hair and generally anything that can will stick to it!

Thanks for looking!

Saturday 21 August 2010

Left handed

I've had some good news this week, my right hand is nowhere near as badly injured as the hospital first thought. The break is healing well and although a bit knackered all ligaments are present and correct. The best news is the cast is off my arm! On with the painting! Although at the moment I can only do 10-15 minutes before it hurts a bit much and I have to take a break (if you'll excuse the pun).

Meanwhile I thought I'd share a picture of what I got upto when I was restricted to painting left-handed. This is a piece of ~28mm resin terrain that I fished out of a bargain bucket at the Attack wargames show in Devizes (£1.50).


I based it dark brown and then drybrushed it progressively lighter brown and finally with a sort of grey/green colour. Its not great, but as it was done with a massive brush and one handed with my wrong hand I'll take it!

I finished it off by building up layers of flock, which is the best way of adding realism to natural scenery. I used; mixed autumn flock (antinociti's workshop), dark green clump foliage, scorched grass static grass, and finally some dead leaves (AW). Final effect is loads better than the painting alone would have been.

I've also painted up a set of three resin pyramids I bought at Attack. They are the wrong scale for warmaster, probably being 6mm, or even smaller maybe 2mm! However they were only £2 for the set and I think they are nice pieces, they can go on the edge of a desert board, or maybe even (with a bit of imagination) be the tops of pyramids almost buried in the shifting sands!


Coming up soon - Numidian skirmishers, Numidian light cavalry (both of which you can see lurking in the pyramids picture) & a very cheap warmaster hedges tutorial.

Thanks for looking!

Wednesday 4 August 2010

Carthage Infantry

These guys are Magister Militum Libyan Spearmen, which are Carthage Infantry in Warmaster Ancients. They were quite nice to paint, as are most MM figures and have a fair bit of detail on them.


Seeing them all based and ranked up I think justifies the decision to base them 8 figures to a stand. Given their more bulky profiles 2 ranks of 4 is enough to fill out the stand without it looking crowded.


I've gone for mainly bronze coloured metal, as that seems to be the historical consensus of Carthage arms and armour. I was intending on painting on shield designs, but with the relatively large shield bosses I couldn't decide what design would work. I may revisit this later if I can think of/find anything suitable.


My wife saw this picture and rightly pointed out that the 1p coin is the wrong way round as it could be a 2p! I'll have to correct that for my next pictures.

Tuesday 3 August 2010

A Gaul-ing piece of misfortune

The Gallic allies for my Carthage force are now finished, but sadly they will be my last Warmaster unit for a while as I've broken the thumb on my right-hand and it's in a cast. I can paint a bit with my left, but not steadily enough for 10mm!

Enough with my misfortune, onto the picture of the Gauls!

There are 5 units in total. That's 15 stands, or 120 figures!


They are not actually a "gallic" warband, in figure manufacturer's speak, as I used a mixture of different figures. I used 4 different packs of vaguely hairy barbarian types from Pendraken and mixed them through the units. My justification is that personally I feel all these barbarian hordes contemporary with the Romans would have been a fairly mixed rabble, with mixed equipment. It is more than likely that some would have scavenged mail off dead enemies, possibly helmets and shields as well.

The packs used were:
Gallic Warband AG1 (Long shields, moustaches, bare torsos. 3 poses; sword, 2x spear)
Dacian Javlinman AD6 (small oval shields, long spears, cloaks, full beards. 3 poses)
Anglo Saxon Great Fyrd AS4 (round shields, short spears, moustaches. 3 poses)
Anglo Saxon Select Fyrd AS3 (Round shields, chainmail, moustaches. 3 poses; axe, sword, spear)


I batch painted them on painting sticks (like lolly sticks), slowly building up to each model being individual. I'd paint an even number of models with 3 different hair colours, then paint alternate models with 5 different shield colours, then 3 different tunics. Finally I based them up and hand painted on some random shield designs with research on the internet into Gallic shields. The result is that even without any individual shield designs I can have 540 unique combinations of model and colour scheme. Resulting in a truly random, but hopefully unified, rabble.

These pictures have been taken using a backdrop, which I haven't used before (just a random landscape from the internet), and I'm fairly pleased with the result.

I'm going to take pictures of anything else I have finished and maybe some terrain as well. On the upside my hand means I'll be bored and more likely to update the blog more often, the downside is I'm not sure what I'll find to blog about!!

Monday 26 July 2010

Numidians

I've been threatening pictures of my new Carthage army for months now, so finally here they are.

This was my test unit of Numidian cavalry, I've since got another 3 units on the go. I couldn't decide on shield designs, so at the moment they are painted to look like leather, or animal skin with stippling of different shades of brown.

See; they're tiny.

The Magister Militum figures are much more fun to paint, although they are not perfect they have a lot of nice detail and it is possible to actual paint by layering, whereas most of the Pendraken ones I've got really can only be base-coated and washed.


Finally my slingers. This unit was part of the Carthage starter pack I got, but to be honest they are not much good in the army when they also make the Numidian javlinmen which are a bit more charecterful (and of which I have a couple of units). I also realised after seeing other people's armies that basing skirmishers 5 to a stand looks better and makes your figures (and cash!) go further, so sadly I've fallen out of love with these guys a bit.

Hopefully I'll present my mixed barbarian types warbands soon..

Sunday 25 July 2010

Attack - Devizes

Last weekend I visited the Attack wargames show just up the road from here in Devizes. It was the first wargames show I can remember going to for a long time and it was a pretty fun experience.

The campaign/tournament games seemed to be well attended and well organised, certainly the Warmaster Ancients one I took part in was great fun. There was a good mix of traders present, but I was a bit underwhelmed that none of them seemed to be trying very hard to sell stuff. There was a complete absence of "show special" deals to tempt you into buying. Certainly the stands that were selling other people's minis were mostly RRP or 10% off RRP, making them more expensive than ordering from Maelstrom or the like.

The sole incentive to buy on the day seemed to be from the manufacturer stands, such as Magister Militum, where you could buy without having to pay the usual £3-5 P&P.

I love the new Firestorm Armada game from Spartan Games and when I saw a stand selling the models, I anticipated spending some of the money burning a hole in my wallet, only to find the models were £35 for a fleet, as opposed to £33 delivered from the internet.

No bulk buying deals, no random blisters, figures, junk thrown in for spending say £50 or £100. Overall very poor value.
I left the show with £60 of the £70 I arrived with over the two days.

On to the WMA campaign - I took a 1250pt Imperial Roman list

General, 2x Legates
4xLegion
4xAuxiliaries2xArchers
2xSkirmishers
1xHeavy Cav, 2xLight CavScorpion & Onager

We were playing standard WMA campaign rules from the Ancient Armies book.

I got 3 territories to give me 2 extra Auxiliaries and 1 Skirmisher.

Game 1 - Seluccid Sucessors (Ben)
Large blocks of pikes mounted on the long edge. He deployed the pikes front and centre and split his archers across either flank, with his skirmishers and Warband on my right and all his cavalry brigaded on my left flank.
I deployed with the legions in the centre, with artillery in the gaps, archers and light cav on the right flank and skirmishers and heavy cav on the left.
The first few turns were plagued by bad command rolls on both sides, meaning the lines didn't really get anywhere close to engaging until the end of the battle.
Most of the fighting was on the left flank where my skirmishers got a bit of a mauling from his light cavalry. I threw any chance of a draw away in the last turn when I got a bit bored and stop concentrating and threw a legion/auxiliary brigade into some of his lighter troops, which they killed but then got minced in return by a counter-charge. Lost 315 - 155 VP.

Game 2 - New Kingdom Egypt (Vince)
I had a hill and a wood just in front of the right-centre of my deployment zone and so based my plan on deploying and advancing to rest the flank of my lines on this and then send a strong flanking force around the other side of the hill.

I had lost a territory giving me auxiliaries and gained one giving me skirmishers in the last game, but unfortunately didn't have the models, so was effectively one territory short.
Again poor command rolls from me hampered the advance, while Egypt (with Rameses commanding warbands on a 10) advanced steadily. I managed to park my flank against the woods though and my archers and skirmishers held the far right flank and killed/drove off the chariots there.

Vince then set up a screen of chariots and skirmishers right in front of my lines (~10cm) meaning he could shoot at me, and could evade if I charged my legions. Setting up a depressing stalemate where I stood there trying to redress my lines each turn without having a clue how to respond. The chariots would pounce on a flank, take off a stand and then retreat again, very demoralising!

In the end though Vince was unable to kill a significant proportion of the army, only taking a single stand off many units, and thus not gaining VP's. The game ended 155 - 100 VP and a draw. The 100 VP's were almost all taken by the two units of archers and 1 skirmishers on the right flank!

Game 3 - Alexandrian Greek (Declan)

I tried something a little different with my deployment here going for the legions centre and left and a body of skirmishers and archers on the right flank, with all cavalry in reserve.

My plan was to appear to refuse the right flank, before swinging the cavalry round there and hopefully hitting him in the flank of the pikes (where they would get next to no attacks back). It relies on a lot of command rolls in a row to spring the trap, but I was confident that if I could pull it off my 3 cavalry units could win the game...
The game was quite cagey again, both sides lacking substantial numbers of skirmishers and reluctant to be charged given the reputation of the other side's core infantry.
In the end although the cavalry plan of mine had a chance of working, Alexander himself led a last turn cavalry charge with his companion cavalry and wiped out a legion and auxiliaries and then overran and wiped out two units of my cavalry.

Loss 405 - 200 VP.

Game 4 - Early Visigoths (Mark)

We both had our fair share of luck and the Visigoths advanced steadily across the board, the onager really came into its own in this game confusing and disrupting a central brigade of warband and meaning the warband on my right flank became more isolated.

After a typically cagey opening we realised that time was running short and there was a mutual unspoken agreement to generally get stuck in a bit as it was the last game of the weekend. The aforementioned warband charged into a brigade of archers and auxiliaries on my right flank, pretty much wiping them out. My right-hand brigade of legion then passed a couple of command rolls in the final turn (9 & 7) to charge the warband and pretty much wipe them out, they then withdrew and were hit again with a counter-charge from pretty much everything Mark still had on that flank, the remaining 2 stands of legion and their auxiliary back-up winning again. When we totted up the damage Mark had won a narrow victory 180 - 270 VP.

Although the legions did well, at 80pts vs 45pt they didn't do quite well enough in resisting taking casualties.

So what did I learn from playing a few games of WMA?

Imperial Rome is a tough list to be competitive with, as it is tricky to bring the enemy to battle. I guess it would work well as a defensive list, but with everyone being aware of this they tended to hold back.

Scorpions are not great - it is very difficult to get them lined up in such a way that they can use their special "pierce ranks" rule, if I was lucky I was getting 4 shots out of them, but because they are so weak in combat (charged by anything they are dead and give up 50pts), and their relatively poor range of 40cm I couldn't use them effectively at all. I would probably leave them out in future.

Skirmishers are very strong en-masse. Against a largely infantry force they can make it very hard to get to grips.

A great fun weekend though and hopefully I'll be able to get together with Gareth, Ben, Mark et al for a few games down in Bournemouth at some point.

Tuesday 20 July 2010

Scenery Manufacturer

I've come across another resin scenery manufacturer on the web and I have to say I'm pretty impressed. Kerr & King mainly seem to make 15mm terrain but have recently added some 10mm items.

Their "desert city in a box" (pictured right) looks fantastic value at £27.50 delivered for all the buildings shown. As soon as we tick into August (and I allow myself some more wargames expenses) I'll probably be buying one to expand my 10mm collection into some urban stuff.

I recently managed to play 4 games of Warmaster Ancients with my Imperial Romans at a campaign weekend at the Devizes Attack wargames show. It was great fun and I met some other local players who were a great bunch of guys, I'll be posting a full report soon and some picture of the Carthage army that is slowly emerging from my painting desk.

Sunday 13 June 2010

Romans in Close Up

So I am well overdue for an update on Warmaster. I thought I'd post up some pictures of my Imperial Roman force. They were my first 10mm models, all from Pendraken. I bought the Imperial Roman 1000pt army deal direct from Pendraken, but then I was fortunate enough to know a guy who was selling off some 3rd or 4th hand Pendraken romans, and I got another ~500pts for £5. They needed striping and some love and attention, but they've come up pretty well.

As I had a grand total of 3 of the Pendraken mounted officers I stuck two to coins to be my Tribunes and then made a little vignette for my Legate. It is just a coin built up to a mound with pink foam, and the normal mounted officer figure with a centurion and a standard bearer. I cut off the normal unit standard and drilled out the bearer's hands, made a simple banner frame from florists' wire and then a square banner from brass sheets, which I got by cleaning and cutting up a tomato puree tube! I finally stuck the very top of the unit standard (the hand) onto the top of the frame. The figures themselves were not painted in any special way that was different to the rank and file. The only difference was the banner that was painted free-hand with a 00 brush.

These are the veteran legion, but are painted in the same way as the normal legion. I free-hand painted the shield design to add a little "pop" to the figures. I've varied the design across the 6 units I've painted up. These (the 1st Cohort) have 4 diagonal "horns" painted at each corner and then a single vertical line through the middle of the shield. The second and third cohorts have 2 and 3 vertical lines respectively. The 4th have a single vertical wavy line, the 5th a double vertical wavy line, and finally the 6th have a single and single horizontal wavy line. This helps me tell the units apart on the battle field.

The two Tribunes - one on a black horse, one on a white.


Medium or heavy cavalry, as these models are larger I tried to add a bit of variety to them by painting on markings on the horses, if you look really carefully you can see some have blazes or stars on their nose (2nd from left, front row) , and some have white "socks" (3rd from left, front row, left front leg). It was quite quick to add and I let the mood take me, if I was too messy with a star, it became a blaze, or a full white face for example.


A close up of the 1st Cohort command unit. I painted the animal furs on the musician and standard bearer as leopard, to add a certain prestige to the unit! It was actually fairly easy, just painted the yellow colour as normal (base coat and brown wash), then adding 3 black spots with a brush tip in a regular pattern.


Unfortunately the Onager model I got cheap was incomplete. Well I assume it was incomplete, but as there are so few pictures of Pendraken models, and no assembly instructions I just assumed it was incomplete! I've since seen this model put together completely differently, so I could be wrong! There were only 2 parts the base frame and then a 3 point frame. I studied the Onagers in Rome:Total War and also looked up some sketches on the internet of Roman Onagers, and built a throwing arm from plasticard tubing, then used a small bit of bent wire in the end and made a rope and throwing cup from greenstuff and twisted brass wire. God knows if it is a correctly put together model, historically accurate, or physically plausible! But it looks pretty cool, and to be honest that is my main aim.

My long-term plans for this army are to buy some Triarii and use them as veteran legions in my Imperial List, but also be able to use them as Triarii in a Republican Roman List, just proxying my Imperial Legion figures for Princeps or whatever. As its 10mm and they are nicely painted I hope to never have the misfortune to come across someone for whom that would be a problem to play against. ;)

Thanks for looking and I hope to have some pictures of Carthage soon.

Tuesday 6 April 2010

Carthage Shield Designs

I've come across some shield design transfers for Numidian and Carthaginian shields. I believe these are by little big man studios and they are for 1/72 miniatures. I'm going to have a go at replicating some of the designs on my 10mm Carthage troops, but not sure how well it will go!!

I've linked the shield transfers below, shame that these are for larger scales as they look pretty nice

Friday 2 April 2010

Some more musings about scale

I've been thinking a bit more about the scale of 10mm wargaming over the past couple of days and I've come across a useful guide on The Miniatures Page website. This compares true scale measurements, wargaming scales and railway model scales, and so is a useful guide in understanding what non-wargames products can be pressed into service without too much bother.

10mm scale corresponds to 1/161 scale, which is almost exactly "n" gauge for model railways, so this means that n-gauge scenery can be used with no problems.

One of the things I've considered buying is more cheap wire trees and I wanted to know how big I could go with their height before it became unrealistic. - The problem with doing research into trees and rivers as a job is that I'm going to be applying an unnecessary level of detail into making sure my rivers and trees are as accurate as they can be!!

The ones I bought from Ebay the other week were 35mm, 38mm and 40mm respectively. These correspond to roughly 4.8m, 6.5m and 8m at scale. Typically this is going to correspond to young trees from the common Beech, Birch, Maple, Chestnut families, and mature Holly, Mountain Ash, Cherry, Hawthorn, and other members of the Rose family. It's worth pointing out that any coloured model trees (which are quite widely available) and represent blossoming fruit trees are going to be a bit large at anything over 50mm tall (10m), as that is about the maximum height.

Typical mature ancient woodland would be best represented by trees that are 75mm (12m), 100mm (16m) and 150mm (24m). These sizes will correspond to typical mature trees of the Beech & Birch families, where they typically have maximum heights in the 15-25m range. Another popular tree model is the willow, where heights are about the 8-20m range depending on sub-species (40-120mm)

For pine type tress you can go a little bit larger, but the advantage of pine trees is that they don't look that different at any life stage, so there is the opportunity for people like me who play at different scales to make a scenery piece that can be used across different games. For maximum heights of Scots Pine & Douglas Fir, you are looking at 35m and 55m respectively, which is 220mm - 340mm!!

The problem with all of these facts is that a lot of wargamers have been raised on a diet of Warhammer with its oddly proportioned buildings and trees. Wargames naturally involve a lot of abstraction and I've no problem with this at all. However being used to the relative sizes of buildings and trees in Warhammer, true scaling in your 10mm games may look a little odd! For example a typical mid-size pine tree in Warhammer at scale would be around 45cm tall, the largest typical examples of Douglas Fir are going to be nearly a metre tall!! But on the table-top you are unlikely to see any trees much taller than 15cm.

For these reasons I am planning to stick to trees no taller than 10cm, as any more, although in scale, will look daft. Hopefully though this will have the advantage that my towering 16m plantations for Warmaster can be pressed into service as 5m tall arboretums for Warhammer as well.

Ultimately although 10mm wargames correspond to n-gauge model railways, you can safely use packs of HO or OO trees with no problem at all and you can even get away with nearly O gauge ones for particularly large trees.

Thursday 1 April 2010

Appropriating Ideas

I came across a section of Old Glory's website for 10mm buildings today and although they are awfully expensive; £30 for 7 unpainted middle eastern building, £50 for a hill fort. It has given me an idea to draw "inspiration" from these pictures in making my own terrain.

I've replicated some of the pictures below to illustrate the great range of products from Old Glory - if anyone from that company feels this is an unacceptable breach of copyright please let me know.

The Buildings show are a middle eastern village (£30), an ancient hill fort (£44), which seems pretty similar to their roman marching camp (and has been presumably painting in cuprinol. And a farm set (£17). There are a variety of things along this theme and a couple of large castles as well (~£90). But for now this will do for a starting point.

I've been thinking of doing a roman marching camp for a long time, but I think I will use 1/2 toothpicks for the palisade. I just feel that the palisade would be made of either wood transported by the baggage train, or cut from the surrounding area. Either way I can't really see them sawing it into planks...

I'm thinking about buying some N-Gauge stone walls from Javis. They are not super cheap, but I think the time to make something similar would not really be worth it. and you can get 6 lengths of wall on e-bay for £4 or something.

Still on the theme of taking inspiration from elsewhere Phil B's Ancient's blog has a great article on making vines (as in wine growing) from pipecleaners and wire, so I'm going to have a go at that as soon as I can find some pipe cleaners. All in all a fair few projects beginning to stack up on my workbench and in my imagination!

It's a shame that I'm doing ancients and not medieval gaming, as otherwise I'd be spending all my money on this pretty modular castle from Kallistra...